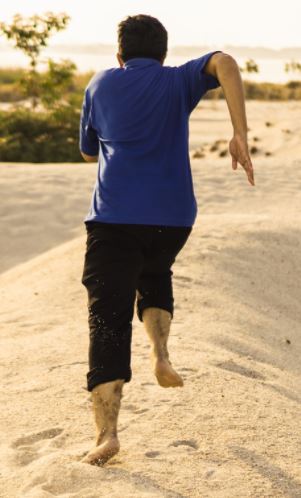
What is a running Cool-down? How to cool-down after a run? Many questions for beginners, but not only. So many regular runners are skipping it!
Usually, we run, then when we arrive at home, we just have a glass of water and jump under the shower.
Every running session should finish with a proper running cool-down.
The main benefit of the cool-down is to bring back the cardio-vascular to the rest level. During the training session, your heart rate increase, and the running cool-down will help your body to reduce gradually the heart rate.
The second benefit is to keep your cardio-vascular active in order to help the muscles to remove the acids and other nutrients that were used by the muscle during the session.
The third benefit of the cool-down is the stretch of the muscle, to bring them back to their original shape. It reduces the tensions to the tendons and helps to avoid injuries.
Globally, the running cool-down is the first step of the recovery after the training session, preparing the body to be ready for the following training session.
After every session, drink plenty of water to re-hydrate, even during winter when you don’t feel thirsty. For the cool down run easy for ten to fifteen minutes to allow the heart rate to return to normal. This will also aid in muscle recovery and prevent delayed onset of muscle soreness (DOMS) which may only appear a few days after a very big session.
In order to benefit from the cool down, it is vital to run slow.
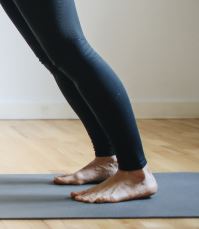
Where possible, it would be of a greater advantage to run barefoot on grass in the opposite direction of which you performed the session.
Easy jog training session
After an easy jog, a few minutes is all you need to cool-down.
Finish your run with a walk or a very slow jog during five to ten minutes. The run need to be very slow at 6 to 7min/km (9 to 11min/mile).
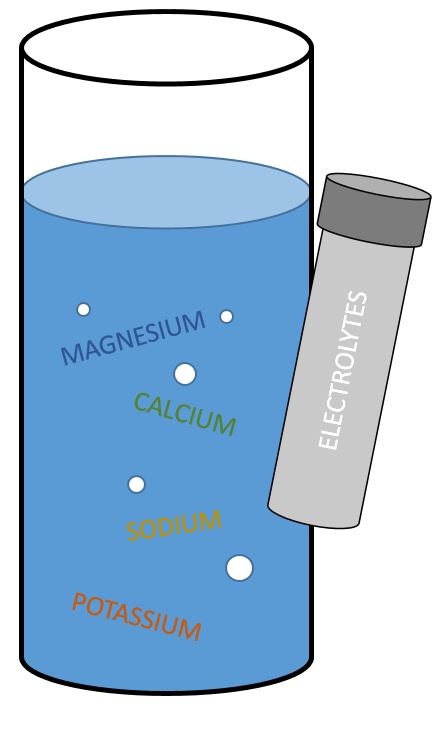
Then the next step is to re-hydrate. Usually, it is important to drink between 25 centiliter and 50 centiliter. If the temperature is high and you lost salt with the sweating, then use a sport drink with electrolytes.
Finish the cool-down with a nice stretch of the main leg muscles, spending extra time on the tight muscles. Spend some time foam rolling very tight muscles.

Speed / threshold session
After an speed or threshold training session, the running cool-down is more important and will need roughly twenty to thirty minutes.
Walking or slow running
Finish your run with a walk or a very slow jog during five to ten minutes. The run need to be very slow at 6 to 7min/km (9 to 11min/mile). If you train on the track, remove your shoes and run bare feet on the grass during ten minutes very slowly.
After a tough session, it is a good time to chat with friends, catch up with usual discussions, analyse the session, review how you feel, relax the body but as well the mind which was concentrated during the session.
Re-hydrating
Then the next step is to re-hydrate. Usually, it is important to drink between 25 centiliter and 50 centiliter. If the temperature is high and you lost salt with the sweating, then use a sport drink with electrolytes. Allways bring your water bottle to track and use it before you complete the running cool-down.
Stretching
Stretching is an important part of the running cool-down need roughly seven minutes. It is starting on the calves and going through all the leg muscles to finish on the lower spine.
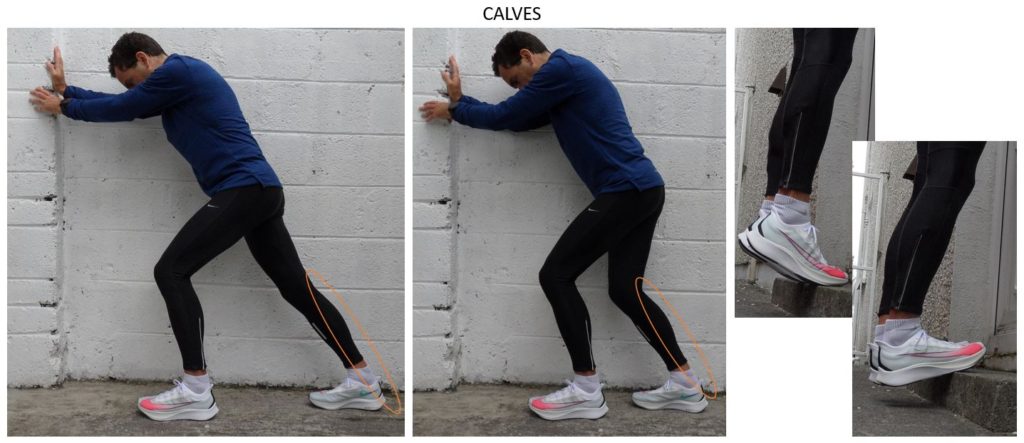
Calves – 1 minute 30 seconds
Calves are the muscles at the back of the lower leg. There are two muscles : the gastrocnemius and the soleus. These muscles are very important for runners, but if they are getting tight, they are going to put tension on the Achilles tendons, foot arch and hamstring.
Three stretches are going to lengthen the muscle fibers:
1/ Stand near a wall with one foot in front of the other, front knee slightly bent. Keep your back knee straight, your heel on the ground, and lean toward the wall. Feel the stretch all along the calf of your back leg. Hold the position for 15 seconds.
2/ Stand near a wall with one foot in front of the other, front knee slightly bent. Also bend your back knee, keeping your heel on the ground, as you lean toward the wall. Feel the stretch in the lower part of your calf muscle. Hold the position for 15 seconds.
Repeat stretches 1/ and 2/ with the other leg.
5/ To finish with the calf, we will stretch both legs with an assymetric movement for a more advanced stretch. Stand on a step. Place the ball of your foot on the edge of the step. Your heel should be off the step. Slowly drop your heel down as you carry weight through the leg. You may hold onto the banister or the wall, as you lower. Go down 10 times.
Tip: To make this stretch more challenging, go down on one foot.
This stretch is part of the stanish protocole to improve Achilles tendinopathy.
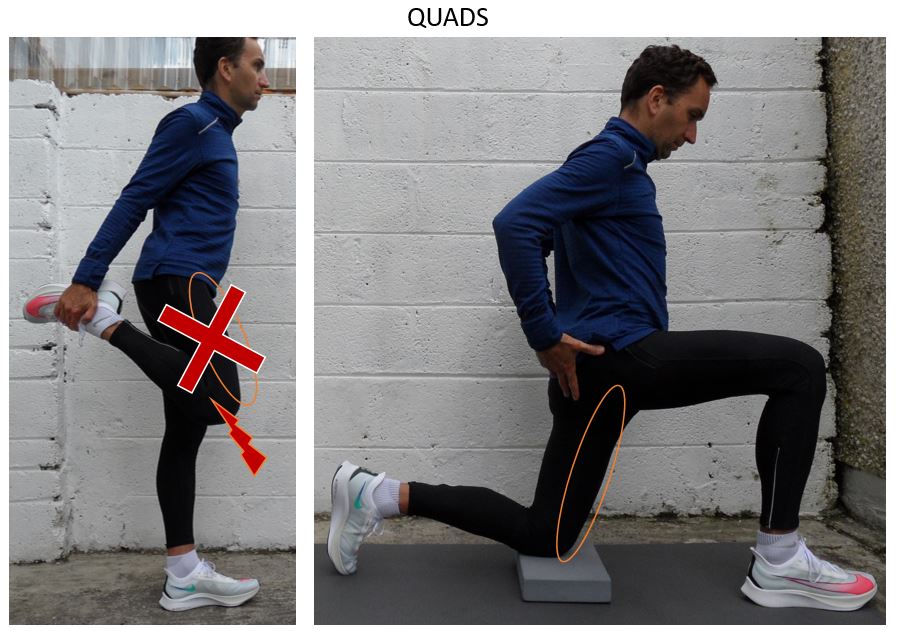
Quadriceps – 30 seconds
The quadriceps are the second most important muscles for the runners. These muscles get tight during sessions and can be painfull after a marathon or running downhill. Stretching the quadriceps is straight forwad.
The usual quadriceps stretch is staying on the right leg, bend the knee and hold the foot on your hand, pull the foot up with your hand to feel stretch on the quad.
This is unfortunatelly putting stress on the knee. I prefer this alternative stretch:
1/ Put your left knee on the floor or on a yoga block, your right foot on the floor in front of you, in a lunge position. Then push your hips forward until you feel stretch on your left quadriceps. Hold the position for 15 seconds.
Tip: To make this stretch more challenging, lift your left foot on a step, or hold your foot on your hand.
Repeat stretch 1/ with the right leg.
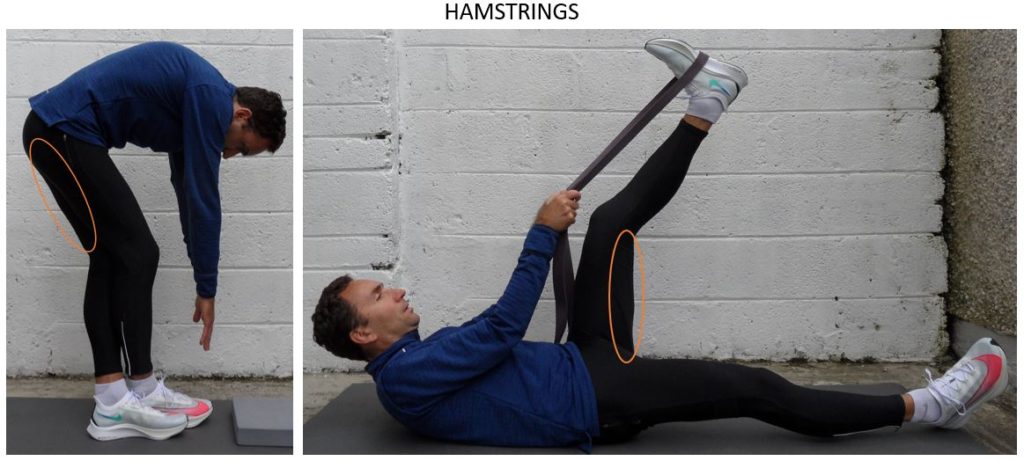
Hamstrings – 1 minute
Hamstring are often injured with sprinter and team sports.
If you have pain on the hamstring, avoid stretching them. They are already stretch because the calves and quads are tight. It is important to do a lot of strengthening with hamstrings and stretch them only if they are healthy.
1/ Bring your right leg in front of the left leg. Put your right foot on the left of the left foot. Both knees need to stay straight. Then lower your body, bending the hips and reach out the ground with your hands. You feel the stretch at the back of the left hamstring. If you are not flexible, reach your knees, shins or ankles. Hold the position for 15 seconds.
Tip: To make this stretch more challenging, stand on a step and reach under your feet.
Repeat stretch 1/ with the right leg.
3/ Lie supine (on your back), use an elastic band or a towel under your left foot. Keep your knee straight. Lift your left leg untin you feel a stretch on your left hamstring. Hold the position for 15 seconds.
Repeat stretch 3/ with the right leg.
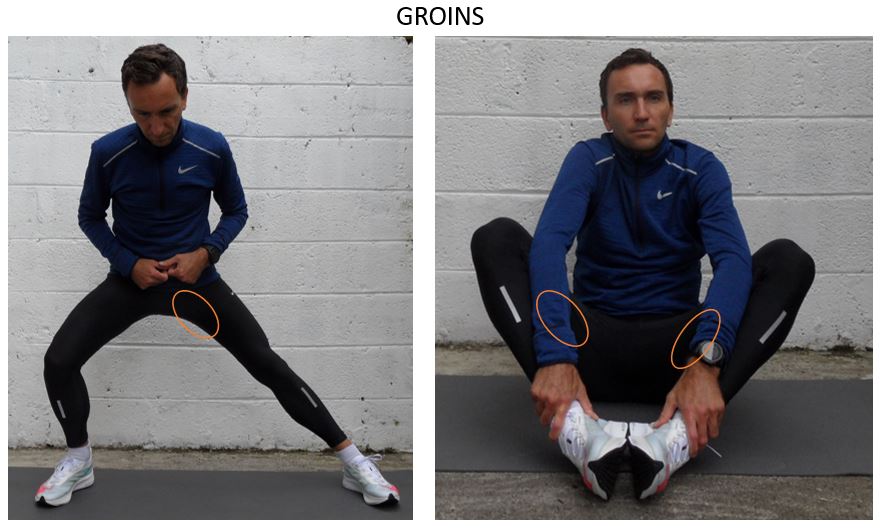
groins – 45 seconds
1/ Start standing, then bring your right foot roughly 1 meter to the right. Keep the left knee straigt. Then bend your right knee and drop your hips close to your right foot in a lunge. Feel the stretch on your left groin. Hold the position for 15 seconds.
Repeat stretch 1/ with the left foot to stretch the right groin.
3/ Seat on the floor. Bring both feet together and hold them in front of you. Use your elows to push your knees down until you feel the stretch on your groins. Hold the position for 15 seconds.
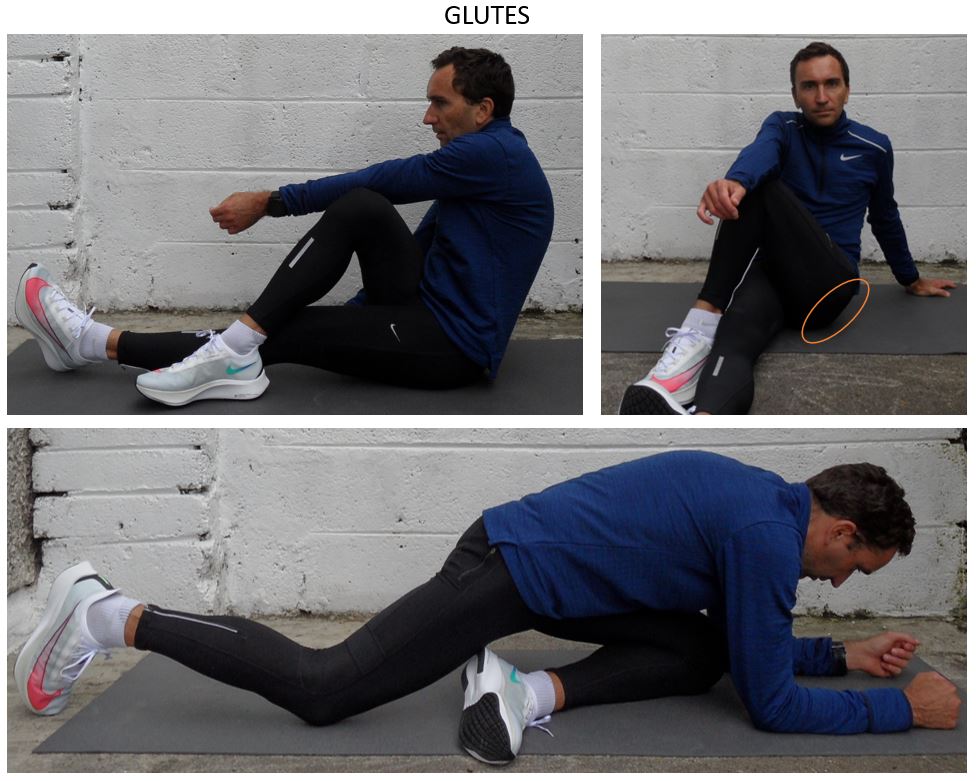
glutes – 1 minute
Glutes can be stretched with 2 movements:
1/ Seat on the ground, keep your right leg straight in front of you on the ground. Bring your left foot on the right of the right knee. Push your left knee to the right with your right elbow. Hold the position for 15 seconds.
Tip: To make this stretch more challenging, turn your shoulders to the left and look behind your left shoulder.
Repeat stretch 1/ with the right leg.
3/ Move on your knees and elbows. bring your left knee close to left elbow. Slowly bring your left foot to your right side, keeping it flexed to protect the knee joint.
Sink your hips and relax your back foot.
Bend your arms a little, but stay high and watch for any discomfort or pain in the knee joint. Hold the position for 15 seconds.
Repeat stretch 3/ with the right leg.
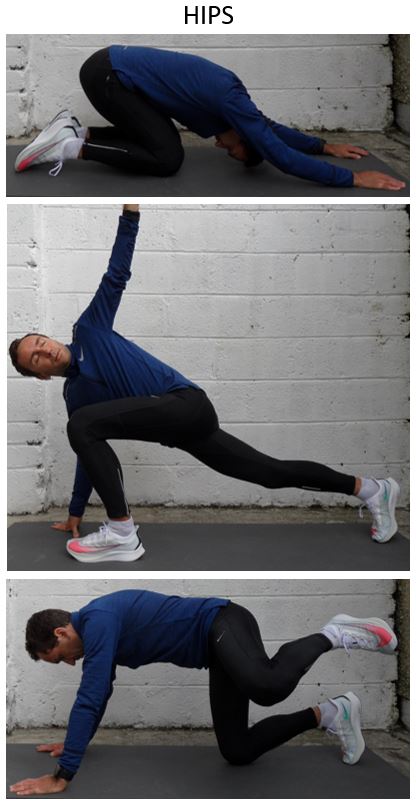
hips – 1 minute 15 seconds
Hips are getting tight when you run many miles. The tightness of the hips is a good thing for runners, but can lead to injuries.
1/ Stay on your knees, and your hands. Keep your arms straigt, and sink your glutes toward your heels. Keep your back flat and feel the stretch on your hips. Hold the position for 15 seconds.
2/ Bring your left leg to a lunge, bring slowly your right knee close to the ground, keeping the right knee straight. The right hand is on the ground at the right of the left foot. Turn the shoulders to the left, bringing the left hand to the sky. Hold the position for 15 seconds.
Repeat stretch 2/ with the right leg.
4/ Stay on your knees, and your hands. Keep your arms straigt, lift your left knee up to be align with your back. Then, without bending your right elbow, bring the left knee to the left, and bring it back down to the original position. Repeat this movement 10 times.
Repeat stretch 4/ with the right leg.
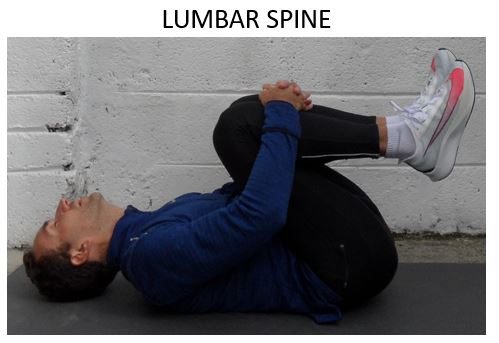
lumbar spine – 15 seconds
Lie supine (on your back), bend your knees and bring them toward your chest. Hold your knees with your hands, keeping the back flat on the ground. Hold the position for 15 seconds.
Summary
This part of the cool-down should last roughly six minutes. It needs to include all muscles, one by one. Follow these stretches:
| Stretches | 6 min | ||
| Calves | 1 min 30 sec | ||
| Straight leg Left | 15″ | ||
| Bent leg Left | 15″ | ||
| Straight leg Right | 15″ | ||
| Bent leg Right | 15″ | ||
| Slow Isometric drop | x 10 | ||
| Quads | 30 sec | ||
| Kneeling lunge Left leg | 15″ | ||
| Kneeling lunge Right Leg | 15″ | ||
| Hamstrings | 1 min | ||
| Standing left leg | 15″ | ||
| Standing right leg | 15″ | ||
| Supine with band left leg | 15″ | ||
| Supine with band right leg | 15″ | ||
| Groins | 45 sec | ||
| Left lunge | 15″ | ||
| Right lunge | 15″ | ||
| Knees on the floor | 15″ | ||
| Glutes | 1 min | ||
| Seated Spinal Twist Left | 15″ | ||
| Seated Spinal Twist Right | 15″ | ||
| Pigeon Left | 15″ | ||
| Pigeon Right | 15″ | ||
| Hips | 1 min 15 sec | ||
| child pose | 15″ | ||
| Modified Left Lunge | 15″ | ||
| Modified Right Lunge | 15″ | ||
| Dirty dog hip Left | 15″ | ||
| Dirty dog hip Right | 15″ | ||
| Lumbar spine | 15 sec | ||
Tip: by going from the ankle up, it helps to go through each muscle without missing any.
Foam-rolling
When you feel that a muscle is tight, spend some time with a foam roller on the muscle itself, but as well the muscle on the other leg. Foam rolling can be a part of the running cool-down.
To get more details, I wrote a detailed article on Foam rolling with the video showing how to roll each muscle of the body.
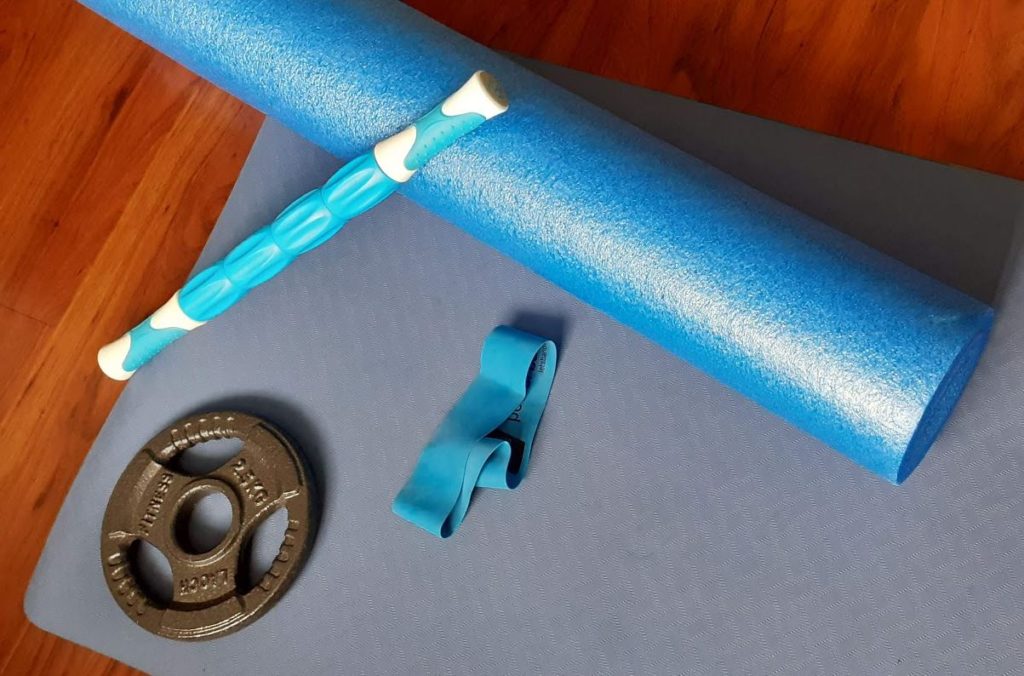
For runners, usually it is important to roll the calves, the quads and the top of the IT band. Use a tennis ball to roll deeply in the glutes. Then finish by using the roll on the back.
Re-activating
This part of the Cool-down need roughly four minutes. It is to work on your core, balance and upper body. You should do these exercise twice:
Plank
Stay on you elbow in the plank position. When you master the plank, lift an elbow and bring the feet closer together. Keep the position during thirty seconds.
Knee lifts
In the standing position, lift your knee above your tight level. Walk by lifting the knees, Try to stay as tall as possible. Repeat 10 strides.
push ups
Perform slow push-ups, remaining few seconds on the top. Keep doing this exercise during thirty seconds.
Summary
Follow these three exercises twice:
| Re-activation | 4 minutes | |
| Plank | 30 seconds | |
| High knees | 5 per side (6 seconds each stride) | |
| Push-ups | 30 seconds | |
| Plank | 30 seconds | |
| High knees | 5 per side (6 seconds each stride) | |
| Push-ups | 30 seconds |
Conclusion
A running training session is not only a run, it is starting with a warm-up, then the session, and finally a running cool-down. The more intensity you have in the session, the more important are the warm-up and the cool-down.